|
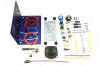
Heinz Stampfl (HB9KOC), who is well-known because of his hand-made precision Morse keys, has also a heart for radio listeners. For some time now, Heinz has been tinkering with several receiver concepts, which he also shows on his web site. It is his aim to be able to offer these projects as assembly kits in the future. But unfortunately, this is not as easy as it sounds. On the one hand, enough kits have to be produced for the project to be profitable, and on the other enough buyers have to be found as well. These days, when everything can be bought as "plug and play" such a projects bears a big financial risk. Despite these risks, Heinz Stampfl now would like to offer a small kit: the Junior 1. Description of the Junior 1 kit (by Heinz Stampfl)
.jpg)
Heinz Stampfl was friendly enough and put a Junior 1 at my disposal for testing purposes. The radio came assembled, though, because I did not have the time for putting it together. As can be seen in the picture, the receiver has the serial number 001. It is the first radio which comes out in the open. I had the Junior 1 on my table for over a month and used it at every opportunity. I mainly used external antennas for the Junior 1. To make this possible, I added a BNC-connector. To test the potential of the kit, I wanted to avoid interferences in my house. On the front of the radio, you can plug in a piece of wire as an antenna with a banana plug. There is also a connector for grounding the radio. To avoid overloads, I used a switchable attenuator and because the Junior 1 is not made for highly effective antennas, I used a 10 - 20dB attenuation. Interestingly, there were no overloads. There were hardly any "ghost stations" to be heard and only during the early evening hours and very weak at that. Because the radio is a simple do-it-yourself project, the Junior 1 needs a little warm-up time because the oscillator drifts a little. You can power the receiver with either a 9V battery or an external power supply with 7.5V to 16V. Because the frequency is not shown, tuning is a little unusual. Starting with the rotary knob all the way to the left, you have to turn it five times to reach the 40m ham radio band. Then you switch to SSB and scan slowly and carefully through the band with the big tuning knob until you hear a station. After that fine tuning is done with the left -0+ knobs until you hear the station clearly. With a little practice and patience, it works rather well. The low noise and the bright and intelligible audio are surprising. Selectivity is good enough to receive SSB signals in the 40m band. If you tune further down, you will come to the 41m broadcast band. Then you select AM again and can listen to programs. Comparisons with other radios showed rather high sensitivity. Very weak stations on a clear frequency could be listened to well and intelligibly. It is clear that the Junior 1 is no DX machine, but for such a small radio, reception is rather good. Conclusion Heinz Stampfl dared to start an interesting do-it-yourself project. For young beginners, who are interested in building a radio themselves, the Junior 1 is the ideal kit. But also for experienced listeners, the kit is certainly interesting. For assembling the radio, you need interest and some experience with a soldering iron. It remains to be hoped that the Junior 1 will become a success. Perhaps then a kit will appear on the market, which Heinz will proudly present on his web page. … The Junior 1 kit is now available at "Stampfl Morsetasten" and costs CHF 72.- Beginning in 2015, the Junior 1 will be available in the shop of the "Funkamateur" magazine. The assembly instructions can be downloaded here. posted November 22, 2014

|

.jpg)
.jpg)
.jpg)