|


ThumbNet N3 SDR
Inspired by a hobby colleague, I was tempted to test a RTL SDR's.
I've had RTL tuner based SDR's on the table in the past.
Unfortunately, the partly very cheap RTL sticks never fulfilled my
expectations. On shortwave these were not to operate on my hobby
antennas. Constant overdriving and enormous noise levels were the
result. In order to get a grip on this, elaborate preselection
measures are necessary, which far exceed the price of the RTL stick.
This present RTL tuner based SDR is worth a test, I thought to
myself. He is reasonable as you can see in the pictures. The already
shielded components on the board are also installed in a sturdy
aluminum housing. So elaborate shielding with a RTL SDR are rather
the exception and can hope for good performance! As the only known
RTL SDR, the N3 has two power options. It can be conveniently
supplied via the mini USB port with the necessary 5V. This has the
disadvantage that get unwanted interference from the power supply of
the PC / notebook in the N3. With the second option, you can connect
a "clean" 5V power supply via the green plug. Super thing that the
manufacturer is thinking about a clean power supply. Absolute
exception so what!
.jpg)
The most
important technical data
- Frequency range: 24MHz - 1766MHz
- Operating modes: USB, LSB, CW, FSK, AM, SAM-DUL, FM,
WFM, DAB + (software-dependent)
- Standard chipset R820T2 + RTL2832U
- 8 bit ADC (RTL2832U)
- Temperature stabilized TCXO (+/- 0.5ppm)
- Antenna connection type F
- Double RF shielding
- Additional connection for clean 5V power supply
- Power consumption 400 mA
- Dimensions: 60x40x20mm (LxDxH)
- Weight: 60g
- Price with aluminum housing double shielded USD 33.50
$
- Reference Source:
Thumbsat
included supply
- Green plug for the external power supply
|
My interest in this
case was not the shortwave reception. The frequency range of the N3
starts so only at 24MHz. Much more was the reception of DAB + in the
center of my interest. But how do you do that? Since I had never
dealt with the reception above 30MHz great, I had to first get some
information. After reading something and thanks tips from forum
colleagues of
dx-u , I managed to receive DAB +
with the N3.
In addition to the N3, it also needs a corresponding DAB + software
with suitable drivers. This I found in the colleagues of
ukwtv.de . There is in addition to
FM and TV reception and DAB + a topic. Under Downloads the
DAB+ Software von Andreas Gsinn can
be found. These should be downloaded. For the N3 it also needs the
right driver , which can also be
found there. It is also important that you install "Visual C ++
Redistributable". Depending on the Windows operating system the
x64or
x86. Also, the instructions on the
download page should read briefly.
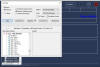
If everything was installed correctly, the N3 should be addressed by
the software. After starting the DAB + software, a search is started
first. This searches the frequency range 170 - 240MHz for stations.
At the Superdiskone Diamond D130 9 * ensembles are found. Among them
are 136 services. Of these 123 audio and 13 * data channels.
*
Ensembles: groups of digital audio broadcasting
stations. Transfer multiple digital radio channels on a
single frequency.
* Data channels: Additional information such as text and
pictures are sent via this.
|

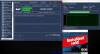
The operation of the
DAB + software is quite simple. Save the stations found during the
search, so that they are available at the next software start. You
should occasionally start a new search. Often new stations are
switched on. A click on the channel name activates this. Now you can
hear DAB + on the computer or notebook. The software also offers a
recording function. The recording is saved in .mp4 format. This
format is best played with the VLC player . Some stations offer
slide shows. Then a corresponding symbol will appear in the lower
left corner of the program window. The DAB + software also offers an
information window "DAB-Info". Various information about the
transfer is displayed here. This is more for the specialists among
us.
Conclusion:
The DAB + reception with the software by Adreas Gsinn is amazingly
easy and good. She is also freeware. What more do you want. Cheaper
you do not get to a DAB + receiver.
-----
With the N3 you can do more. I was still concentrating on receiving
FM stations. The very large frequency range allowed even more things
to be received, as an example, to listen to the civilian radio. Here
in Switzerland this is allowed. But that would go beyond the scope.

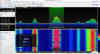
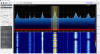
The N3 is also good
for FM reception. Overloads were only a few outside the FM radio
band to receive. Mainly at 85MHz. Within the radio band were
occasionally shortwave transmitters audible and visible. but that
did not matter much. This did not disturb the FM reception, because
the FM stations were much stronger and the interferers mostly
covered. As an antenna here also the Diskone Diamond D130 was used.
Conclusion:
As already written above, I am actually pure shortwave listener, but
let me be carried away to the excursion to the upper frequencies.
The N3 is a recommended RTL SDR for its price. On FM and above he is
really low noise. Other RTL tuner based SDR's were playing much
harder on the upper frequencies.
installation Guide
To make the entry easier for those interested, I have written a
small installation guide here. The device names might be different
in Device Manager.
In order to operate other programs, it requires a small, but very
important change! The driver that addresses the N3 needs to be
changed. The Realtek driver (driver2) that communicates with the DAB
+ software does not work with the software SDR-Console and SDR #! To
do this, the Zadig driver must be installed.
For inexperienced, the procedure below is relatively difficult to
accomplish. You have to know what you are doing. Therefore, I
expressly warn against it and take no responsibility for any damage
to the operating system!
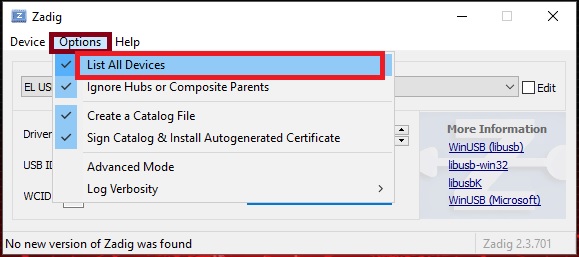
Open Zadig installation program, click Options, select List All
Devices.
Open
selection by clicking on the arrow on the right and select "Bulk.In,
Interface (Interface 0)".

Then
click "Reinstall Driver". Then the WinUSB driver will be installed.

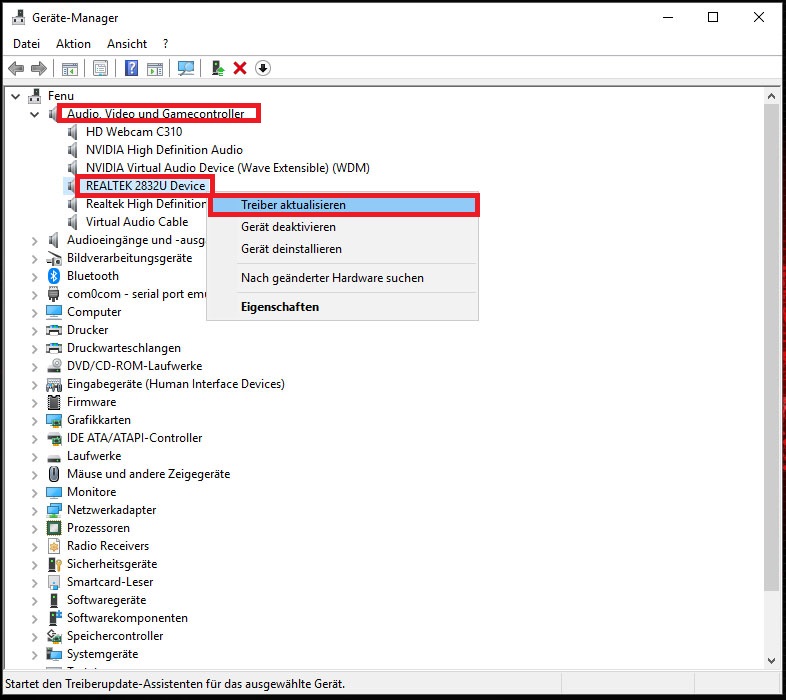
f
the Zadig driver is installed, open the Device Manager. There, under
Audio, Video and Game Controllers, select the Realtek 2832U with the
right mouse button "Update Driver".
Then select "Search
for driver software on the computer".

Select "Choose from a
list of available drivers on my computer".

Select the red framed
driver "Bulk-In, Interface (Interface 0)" and click on Next. Thus,
the driver is selected.

With the above driver
you can operate the N3 with SDR-Console as well as SDR #. If you
want to go back to the DAB + reception, the whole procedure has to
be done again, except that you choose the USB-device "Bulk-In
Interface". Again press right mouse button to update driver.

The same procedure
here too. Just to select the driver "Realtek 2832U Device Version
64.1.521.2012 (21.05.2012) and click on it to load the driver for
DAB + again.

Summary of the
required programs and drivers. Are linked to the provider.
DAB+ Software
Treiber 2 (Realtek) for DAB+ Software
Zadig Treiber
for SDR-Console & #SDR
SDR-Console
SDR#
postet: 06.11.2017

|

.jpg)
.jpg)
.jpg)
.jpg)
.jpg)
.jpg)