|
Airspy HF+
In
the autumn of 2017,
Airspy's website featured a new SDR
to shake up the scene! The Airspy HF+. With its very good
specifications and a competitive price of $ 199USD, the developer
and Airspy company owner Youssef Touil sparked hype on various hobby
forums. Much has been discussed and speculated. Because it was said
in many places, the Airspy HF+ can offer the expensive Direct
Sampling SDR's.
.jpg)
Working principle of the Airspy HF+ The HF+ is like the other Airspy devices from the same house, a tuner-based SDR. This means he works with mixer, PLL circuit and VCO. The signal passes through from the antenna, a tracking lowpass / bandpass filter. Thereafter, the signal is mixed in a special mixer and then digitized. It then passes through the DSP and is then passed on to the PC via the USB interface. There it can be used with various programs, such as SDR # and SDR Console demodulated and edited. However, the operation of the new mixer differs from the usual mixers of RTL tuners. The HF+ works with a so-called "Polyphase Harmonic Redjection Mixer". This new Polyphase Harmonic Redjection Mixer allows the Airspy HF+ to stand out in the low-budget class.
Inside the Airspy HF+ From the outside, the HF+ cuts a fine figure with its elegant cast aluminum housing. How does it look inside? By unscrewing the four screws and removing the bottom cover, the view of a clean processed board is free. Important components are additionally shielded with a sheet metal housing. In the place a note; the HF + invites to modifications! But more below.
.jpg)
Compatible software for the HF+ SDR # The
standard software for the HF+ is SDR #. This free software, which
also supports some other SDR's, was developed like the HF+ by
Youssef Touil. It is a flexible and responsive operating software
that leaves almost nothing to be desired. The SDR # is stable and
constantly evolving. It also allows you to remotely control other HF+ using the spy server. SDR# can be functionally expanded
enormously with "plugins". For such complex programs, training is
essential and time-consuming. Some settings and activating functions
can only be changed by accessing the program files. For users
without knowledge a difficult hurdle! Like any software, SDR# has its own peculiarities. A special feature is the reception level
indicator. Normally the signal level is displayed in S-steps or dBm.
Not so with SDR#, which uses "dBFS" as a level meter! A rather
unknown and unfamiliar type of signal display for the normal
listener. What's up with the dBFS? After clarification with Youssef
and after some confusing discussions on the forum
dx-u, here's the
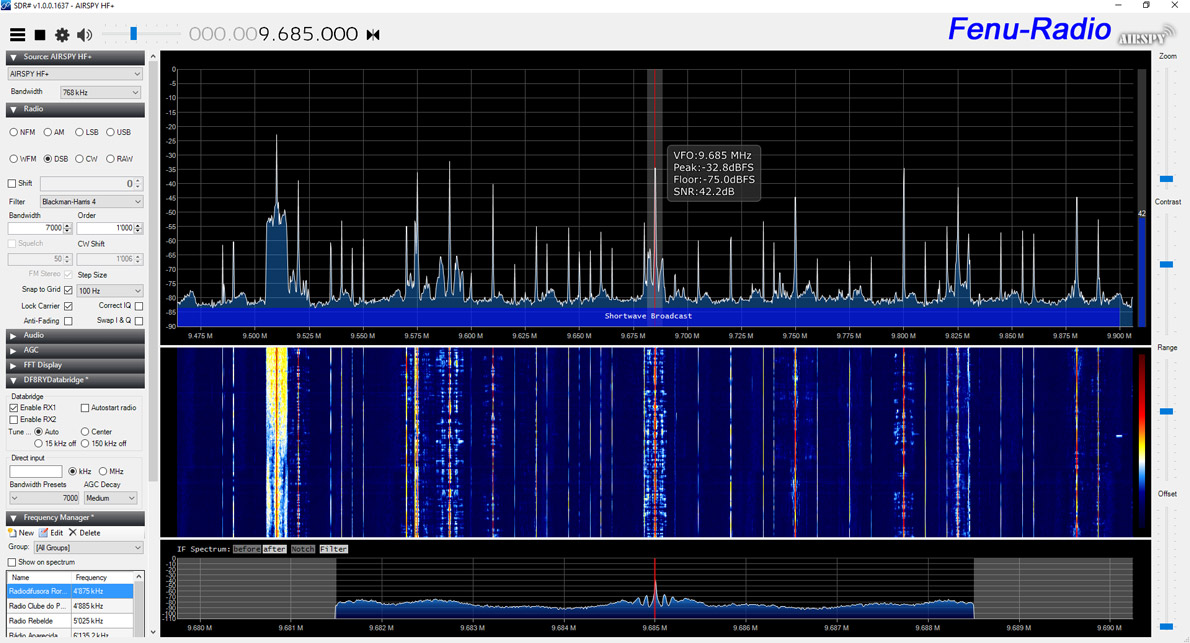
explanation: << The signal-to-noise ratio serves as an evaluation number for judging the quality of an (analog) communication path. To be able to extract the information safely from the signal, the useful signal must stand out clearly from the background noise, so the SNR must be sufficiently large. If the SNR drops, the error rate increases with digital transmissions. As a characteristic of a receiver, the SNR characterizes when the receiver can distinguish noise from the signal. For a human being, at least a SNR of about 6 dB is required in a noisy signal in order to be able to hear the language contained therein >> SDR# does not have to be installed, which greatly simplifies the commissioning of the HF+. Connect the HF+ to the PC via USB cable, start SDR# and select the Airspy HF+ in the upper left corner under "Source" and click Start.
SDR Console V3 The well-known and popular SDR-Console V3 fully supports the HF+. Long before the HF+ officially came on the market, Simon Brown had received a pre-production device to integrate it into the SDR-Console V3. It was worth it! Although the SDR-Console V3 is still in the "Preview" phase and still has various bugs, it still makes it fun to work with. If set correctly, you will get the best performance from the HF+. With the V3 you can also access the spy server network.
The spy server network With SDR# and SDR-Console V3 you have the possibility to access online Airspy HF+. The website https://airspy.com/spy-servers/ lists some HF+ but also other Airspy or RTL SDRs that allow remote access. To access HF+ online, you only have to go to "Source" in the menu "Spy-Server" and enter the dialing address, which can be found on the Airspy website. As an example the address of my HF+: sdr: //fenu-airspy.ddns.net: 5555 For comparisons and first steps with the software, this is a very good option. As long as you are accessing a device on its own and it is unlocked to receive the entire frequency spectrum, you can test the device almost without any restrictions. Once a second user accesses the same device, you can only move in the 660KHz wide spectrum that is currently visible. Unfortunately, this had to be done because the data become too big and the transmission would collapse.
On a wave hunt with the HF +
After reading so much about the HF+, I was naturally very curious
about the reception behavior! Before I crashed into the DX-turmoil,
I first heard in the stronger KW and MW channels purely. First, the
low background noise was noticeable! I would not have expected that.
Quickly turned on the Winradio G33DDC Excalibur Pro to compare the
situation. Indeed! The small HF+ offered the same low noise as the
10x more expensive Winradio. The calibrated display of the Winradio
showed -135dBm in the 25m band as a noise floor. Since the SDR #
software uses "dBFS" as a level meter, this could not be converted.
But sonically, both were alike. Weak signals were no problem at all
for HF+. The reception quality was in the first rough overview as
good as the Winradio.
I collected the above
experiences in the first few hours. That was sobering and somewhat
dampened the initial euphoria. But that did not stop me from testing
and comparing the HF+ as always. So we start the test on the lowest
receivable frequency. An additional modification is a firmware update of the HF+. A few days after receiving the HF+, I got the firmware update from Airspy for testing. This update changed the AGC control limit by -6dB, which made a good impression. The reception became quieter and more pleasant. In particular, the gain control of very strong signals has been improved. Interestingly, there were fewer intermodulations after the update. The latest firmware updates can be downloaded here. At the bottom of the website. https://airspy.com/airspy-hf-plus/ The latest SDR# Software can be downloaded here. https://airspy.com/download/
[photogallery/photo00020851/real.htm]
Audio comparisons between Airspy HF+ and Winradio G33DDC Excalibur Pro Granted, a somewhat unusual comparison! But given what the HF + is
said, I still find it fitting to compare a low-cost SDR with a
premium SDR. When listening to the audio comparisons necessarily use a headphone!
Conclusion: After the intensive test phase of about 4 weeks I got to know the HF+ well. With SDR# both with the SDR console V3 was able to convince the small HF+. Not in all respects, his behavior on good amateur antennas revealed his weakness. The large signal behavior was not always good enough. During the day the HF + played great and without problems. In the evening, however, ghost stations appeared in the VLF area and on the shortwave. Apart from that, the HF+ delivers excellent reception performance in all areas. In the low-budget class a blast! The HF + is a highlight in the SDR scene! Best price performance ratio. Posted 09.02.2018
The HF+ is undoubtedly one of the best low-cost SDR's. However, as the previous test showed, the HF+ produced intermodulation and ghost signals on hobby antennas. Youssef Touil has responded to that. Together with the radio amateur Leif Asbrink (SM5BSZ), who has an excellent knowledge of HF technology, he developed a preselector for the Airspy HF+. The goal was to install a hardware extension (add-on) in the small housing of the HF+. After about 6 months development time it was time. I received the very small preselector with the dimensions of approx. 32x16mm directly from Itead, the manufacturer of Airspy products, for testing.
.jpg)
[photogallery/photo00025990/real.htm] The installation was not easy. Without the right tool, this can not be done. It is absolutely necessary to have an SMD soldering station and magnifying glasses. Also experience in soldering of SMD components is required. First, the coupling capacitor had to be removed at R3. Subsequently, three pieces of cable were soldered to the solder pads of the preselector and to the terminal solder joints on the motherboard. The preselector was then glued to the HF+ board with double-sided tape. Then the antenna input/output at R3 had to be soldered. Here only solder bridges were made. Finally, a ground bridge with a short piece of cable to the opposite shielding was made. The installation took just under an hour. After the HF + was screwed together again, it could start.
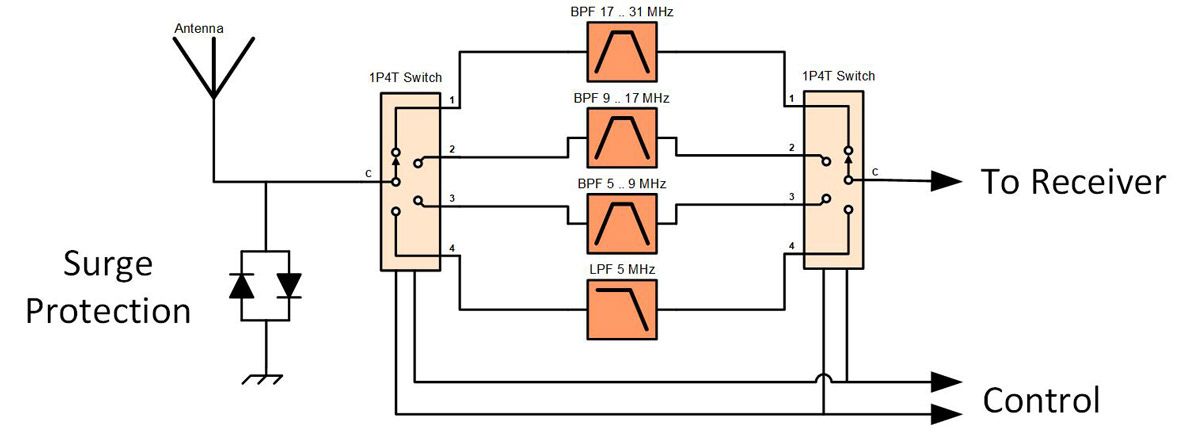
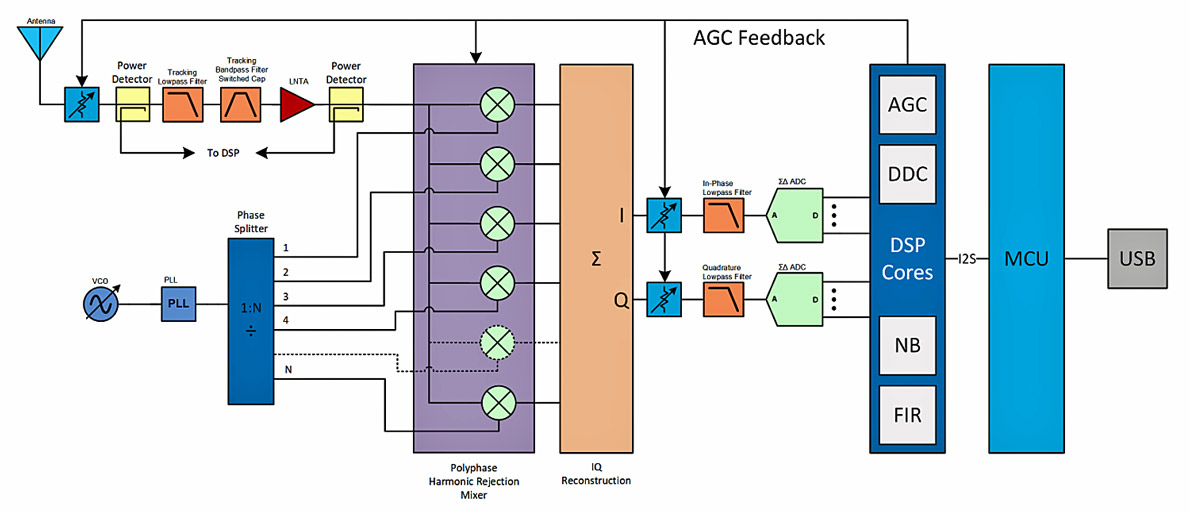
Block diagram of the HF+ preselector The antenna input is protected by a surge arrester. This prevents the penetration of harmful overvoltage, which protects the subsequent electronics from damage. Then the signal is switched to the corresponding filter depending on the set frequency. This is done by the two electronic switches "1P4T Switch". The filtered signal is then fed to the receiver. Filter switching is controlled by the firmware of the HF+. Unfortunately, no bypass switch position was provided. That would have been very interesting to make comparisons!
As already mentioned,
the preselector is controlled by the firmware of the HF+. So other
SDR programs can be used instead of SDR#. First of all the
SDR-Console V3! With this I have made my comparisons. It's easier
for me to use than SDR#. According to the developers, the Airspy HF+
with built-in preselector should approach the reception performance
of the Perseus SDR, or even be a little better. The HF+ with
built-in preselector should have a dynamic range of 105dBm. These
are values that have semi-professional devices!
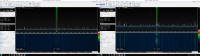
Picture below: In the same frequency range at exactly the same time and with the same antenna, the HF+ with built-in preselector. The differences are very visible. Absolutely free of intermodulation and other unwanted signals.
Illustration side by side in full resolution. Click on the picture below.
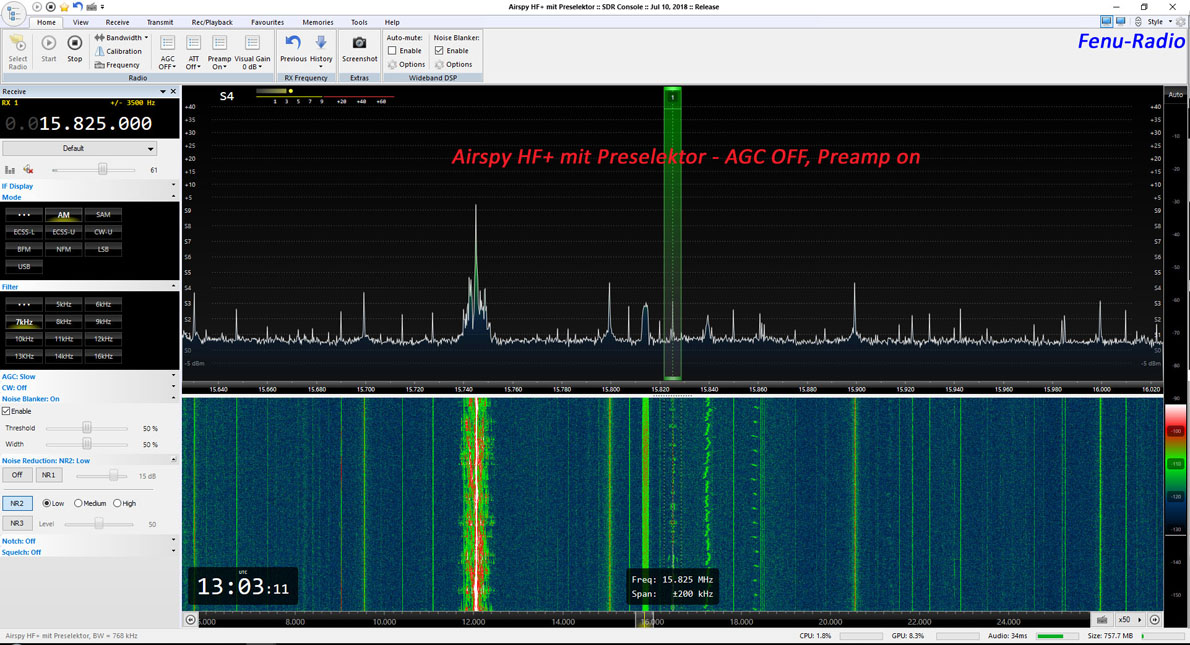
Picture below. In the 19m band of HF+ without preselector with other settings at exactly the same time with the same antenna. AGC off, and preamp on. A setting that the HF+ without preselector can not handle. The HF+ overdrives heavily.
Picture below: In the 19m band of the HF+ with preselector with the same settings at exactly the same time with the same antenna. The amplification of the signal with the preamplifier is easily handled by the HF+.
Illustration side by side in full resolution. Click on the picture below.
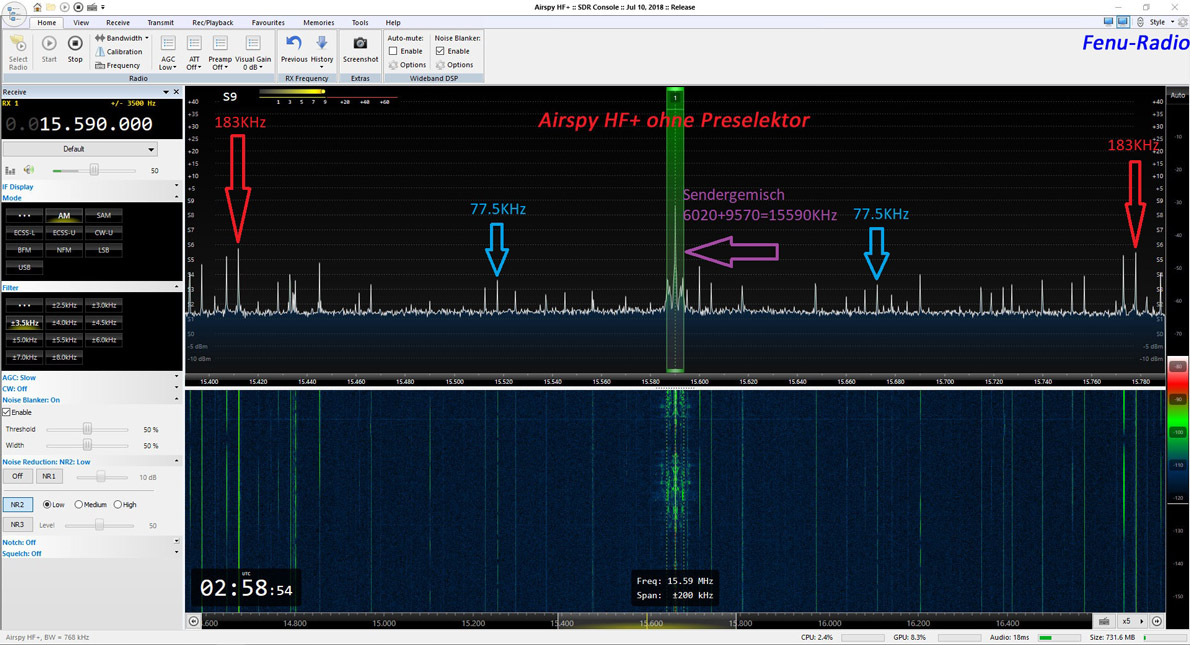
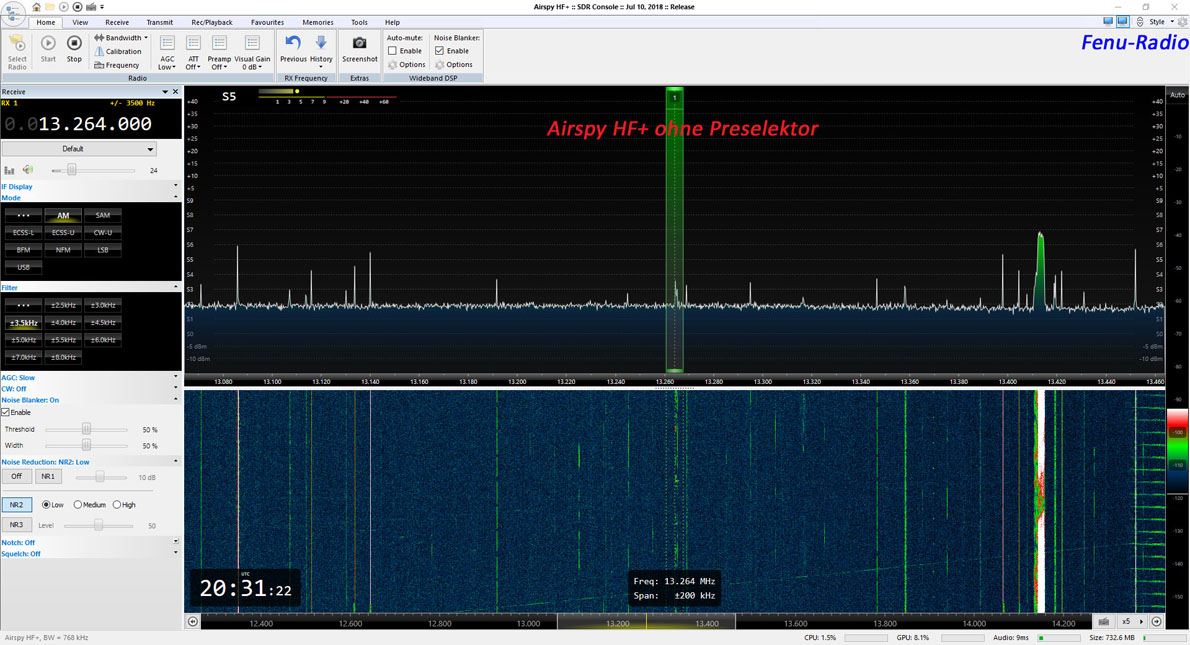
Picture below: Depending on where there are strong signals in the frequency band, signal mixtures form at HF+ without preselector. From approx. 13MHz these signal mixes are always accompanied with disturbances from VLF and the long wave at 15590KHz. And to the left and right of the center frequency.
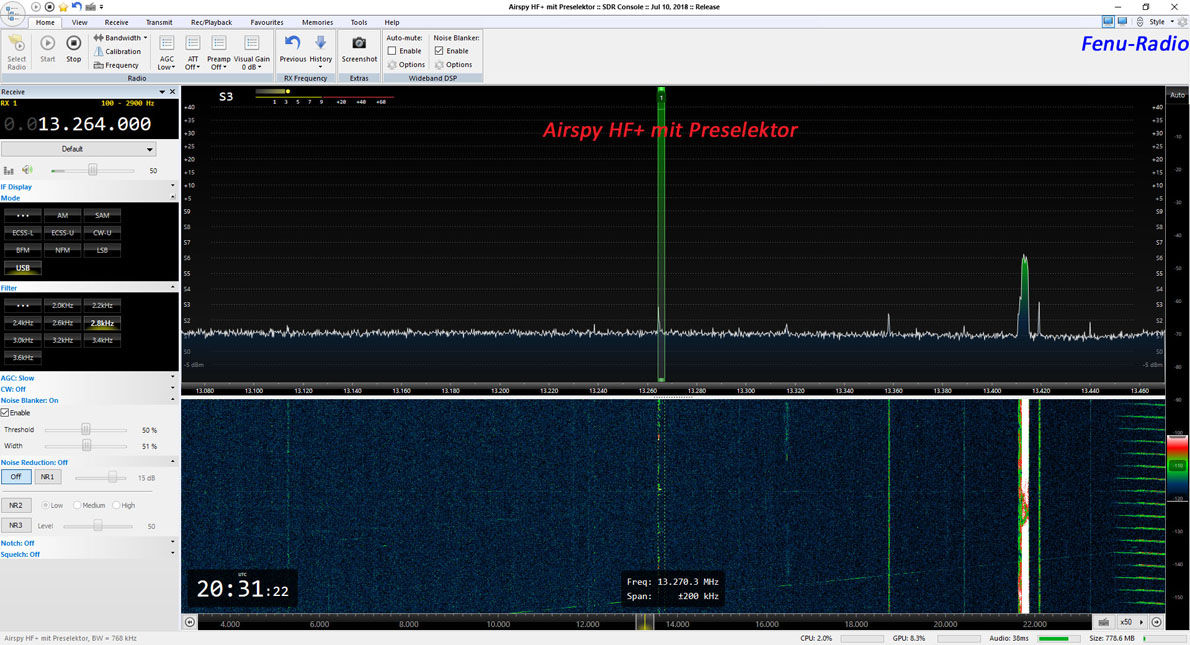
Picture below: The HF+ with preselector. Apart from the local disturbances, no unwanted stations and transmitter mixes are detected.
Illustration side by side in full resolution. Click on the picture below.
Picture below: Below the 22m band in the utility area. Again, the same picture. Without preselector, temporarily fluctuating overload phenomena.
Picture below: Below the 22m band in the utility area. No interference with preselector.
Illustration side by side in full resolution. Click on the picture below.
Conclusion: posted: 28.07.2018
|

.jpg)
.jpg)
.jpg)

.jpg)

.jpg)
.jpg)
.jpg)


.jpg)
.jpg)
.jpg)
.jpg)
.jpg)